Patterns From
Quilt Design Northwest
|
Patterns From |
|
|||||
|
|
|||||||
Machine Paper-Piecing ……my way
The biggest challenge faced by machine paper-piecers is how to make sure that fabric cut for a patch will fit the patch before a seam is sewn. Most paper-piecing processes published in books and taught to beginners call for the quilter to pin the seam line, fold the fabric back on the line and then hold the unit up to the light to see if the fabric covers the intended patch. My technique insures proper coverage at the sewing table without this pinning and folding.
In these instructions we will be working with a paper-piecing unit "C" that is made up of 4 pieces. If you are working with a 'pierced pattern', i.e. one that was created by needle piercing all lines with your sewing machine, then you may move on to Step 1. If your pattern is not needle pierced, before starting to work with the fabrics for the block fold the pattern back on all sewing lines and then flatten the pattern again. Creases in the paper will make future steps easier.
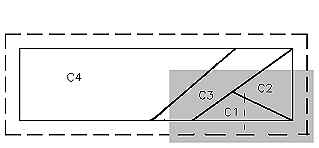
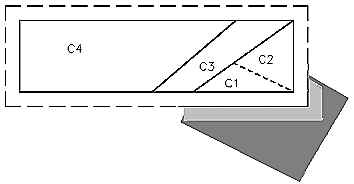
| Step 1: Lay the fabric for the first patch right side down on the table. Position the paper-piecing over the fabric such that the fabric extends at least 1/4" beyond all C1 lines on all sides. See Diagram 1. Baste the fabric and paper-piecing pattern together through the middle of patch C1 as shown by a dashed line in the diagram. This better stabilizes the patch for the next step than a simple pinning would do. |
Diagram 1
|
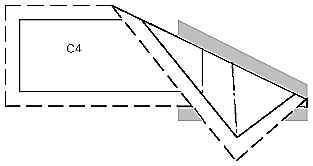
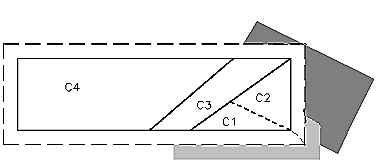
| Step2: Fold the paper-piecing pattern back along the next sewing line, in this example the line between patch C1 and C2. Trim the excess fabric from the previous patch 1/4" from the paper fold. |
Diagram 2 |
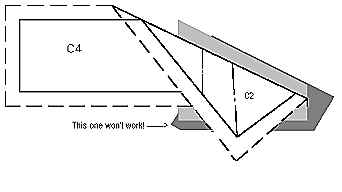
| Step 3: Place the fabric for the next patch right side up on the table. Place the paper-piecing pattern over the fabric so that the edge of the fabric from the cut made in Step 2 is aligned with the fabric for the new patch. If the fabric for the new patch is big enough and properly aligned to cover the patch's area after sewing, it will extend beyond the 1/4" seamline for the patch as it is now folded. Diagram 3a shows fabric (the darker fabric) for patch C2 that is not big enough. |
Diagram 3a |
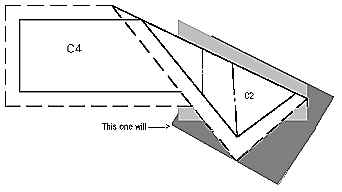
| Diagram 3a shows one that is big enough.
|
Diagram 3b |
| Step 4: Carefully flatten the paper-piecing pattern. Move the pattern and fabric to the sewing machine (you might want to pin to keep the fabric patch in place) and sew along the sewing line as marked on the pattern taking a couple of back stitches at each end of the stitch line. It is OK for the stitching to extend over the solid line. Note: for paper piecing you should set your stitch length smaller than the normal piecing length. In Diagram 4 that line is marked with a short dashed line. |
Diagram 4 |
| Step 5: Press the patch open. From the paper-piece pattern side the block will look like this.
|
Diagram 5 |
Repeat until all patches are covered; then, trim all fabric 1/4" from the outer sewing line marked on the paper-piecing pattern. Note: The block or unit trimming line is often marked with dashes as shown in all the diagrams above. Sewing lines are generally marked with solid lines. Never cut on the sewing lines!
| Contact Information: Quilt Design Northwest |
|
Last Updated on December 16, 2006 |